

Looking for a safe and reliable way to backup your WordPress site?
Want a how-to guide that’s simple and super easy to follow?
Then look no further!
Today we’re going to talk you through the process of backing up your WordPress site step by step using the world’s most popular and trusted plugin, Updraftplus.
Bonus. It’s also completely free.
Ready to get started?
Then let’s dive right in.
What is Updraftplus?

Updraftplus is a WordPress plugin that you can use to quickly and easily backup and restore your site directly to the cloud.
You can also sync it with remote storage solutions like Dropbox and Google Drive so that your content is always safely stored.
There are currently over 2 million active users of Updraftplus and the reviews are overwhelmingly positive.
Most people love Updraftplus because it’s really easy to navigate, and also because its developers always keep the software fully updated.
Updraftplus is absolutely free to use. However, they do offer both premium (paid) packages and individual paid add-ons for those that want them.
Why do I need to backup my site?
Backing up your site on a regular basis is good practice to protect your hard work.
Regular backups protect you from hackers, dodgy updates and server crashes, as well as covering you if your hosting company goes out of business.
Regular website backups can also be a lifesaver if you make a mistake you need to rectify, (such as accidentally deleting a file), or if you have compatibility issues after a new installation of an add-on, theme or plugin.
Step 1 – Install Updraftplus.
- First, open your WordPress dashboard.

- Select the “plugins” option from the menu on the left side.
- Select “add new”.
- You should now see the “add plugins” page. Use the search bar on the far right to Search for Updraftplus.
- Once you see the plugin info, click the box on the right that says “install now”.

- Once the install is complete, click “activate”.
Step 2 – Choose how you want to backup your site.
With Updraftplus, you can complete one-click immediate manual backups any time you like. This is the simplest way to back up your site.
However, if you think you might forget to backup regularly, you can create a schedule for automatic backups without too much effort.
Here’s how to access the available options for backups:
- In WordPress, select the “tools” option then the “settings” option from the menu on the left.
- Select the “Updraftplus backups” option from the following menu that appears:

You should now see the Updraftplus backup and restore page, it looks like this:

As you can see in the image below, the backup/restore page gives you the options to Backup now, create a schedule for backups, restore and to clone/migrate:

For now, we’ll look at how to do an immediate manual backup, and how to create a backup schedule (we’ll look at the “restore” function in more detail further down).
Backup Now
This pretty much does what it says on the tin. Press the big blue button any time you want to do an immediate backup manually.
You can either download your manual backups to a local server or you can choose to have Updraftplus automatically upload your manual backups to any number of remote storage locations (we’ll go into that more in just a second).
Create a backup schedule.
If you select the “settings” option (3rd tab along next to the migrate/clone button), you will be able to create your own schedule for backups.
To set up an automated file or database backup schedule, first select “settings” then choose your preferences from the drop-down menu:

You should see the following options:
- Every 4 hours
- Every 8 hours
- Every 12 hours
- Daily
- Weekly
- Fortnightly
- Monthly
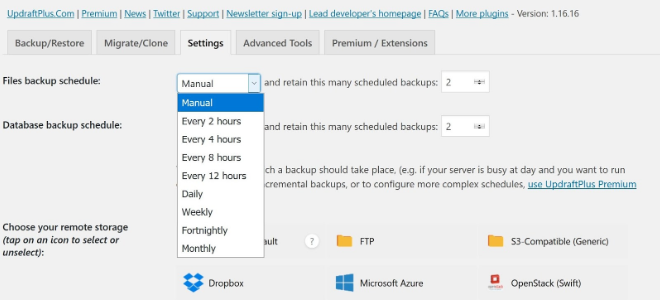
When choosing how often to backup, you should consider the frequency with which you post new content.
Don’t forget to hit the save changes button at the bottom of the page once you have finalised your backup schedule!
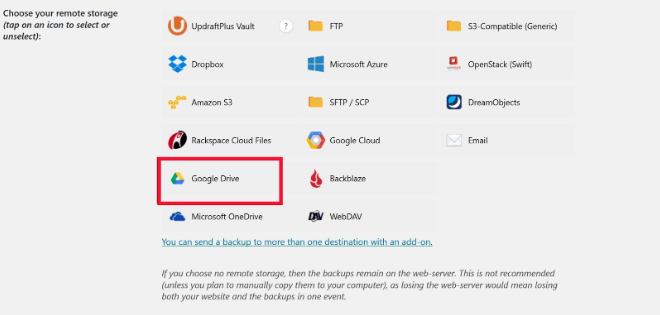
Step 3 – set up remote storage.
There are plenty of options when it comes to storing your backed up data.
Updraftplus is compatible with several remote storage providers, including (most notably) Dropbox and Google Drive.
For the purposes of this tutorial, we’ll show you how to store your backups using Google Drive, but feel free to use any of the providers below.
To get started hit the “settings” tab in WordPress again and then scroll down and select the option to “choose your remote storage”.
Select Google Drive (or whichever option you decide to go with).
You should now see some instructions (which will vary depending on the storage option you chose).
For Google drive, you’ll see this message:

Set your preferences, then go ahead hit the “save changes” option at the bottom of the page.
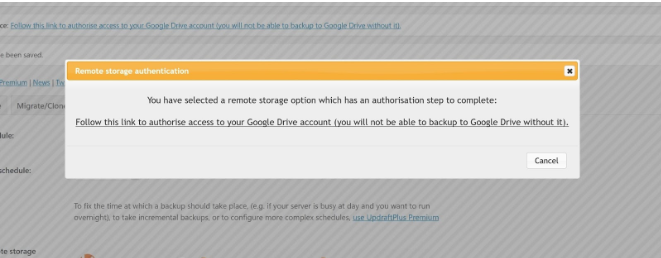
If you are using Google Drive, the next step is to authenticate, so you should see this message pop up:
Click the link and you will be prompted to sign in with your Google account. You should see the message below:

Select the account you want to use and follow the prompts to allow Updraft access to your name, profile pic and email address.
You will then see the following message, which asks permission for Updraft to download and manage any Google Drive files opened with Updraft.

Click allow to continue.
Now you’re ready to complete the setup process!
You’ll see an orange message pop up (see the image below).
Simply click complete setup to connect Updraftplus with Google Drive and your good to go!

Each time you backup using Updraft, your data will automatically be saved and stored in your Google Drive.
If you want to be doubly sure that your precious content is saved, you can store your Updraft backups in more than one remote storage location.
However, you would need to either upgrade to the premium paid package (starts at $70) or buy the multi-storage add-on (costs $20) to do this.
How to restore your existing backups.
Have no fear! Restoring backups with Updraft is quick and easy.
Here’s what you need to do.
Remember the updraft Plus backup and restore page? Sure you do, it looks like this:

Well, what you’re going to do now is scroll down until you see the “existing backups” section:

You should be able to see all of your existing backups, so select the one you want.
Then, you’ve guessed it, go ahead and click that restore button on the right.
Next, you’ll see the following message which will prompt you to choose the components you want to restore:

You can choose from the following 5 options:
- Plugins
- Themes
- Uploads
- Others
- Database
If you want to do a full restore of your site, select all five. Then hit restore.
Wait a few seconds while your files are retrieved:

then Follow the prompts on the next few pop-up messages you see (this mostly involves clicking a few more restore buttons).

When your all done, you’ll see this message and you go get yourself a well-deserved cup of coffee:
